How I Created My Personal AI Robot
[ AKA JARVIS MARK II v3.7.2 ]
Mark II is a project where I have made an AI assistant using a microcontroller. Not with a microprocessor. [ MARK III will be based on microprocessors] I did this to create a cheap robot on which the programmer could easily deploy AI. Taking advantage of their practical setting to learn advanced concepts in machine learning. If you are wondering how this AI ROBOT is working without a processor.
Let me explain this
Description Of The Robot
[ Bot Comes with # ]
- ESP32 - CAM for OpenCV
- Pan and tilt accessibility of the camera
- Ultrasonic sensor to measure the distance
- Microphone Sensor and Motion sensor which gives inputs for theft detection
- Robotic arm for caring the objects
- And gear for parallel adjustment
- And the body is made with MFD [ Medium Density Fiberboard ]
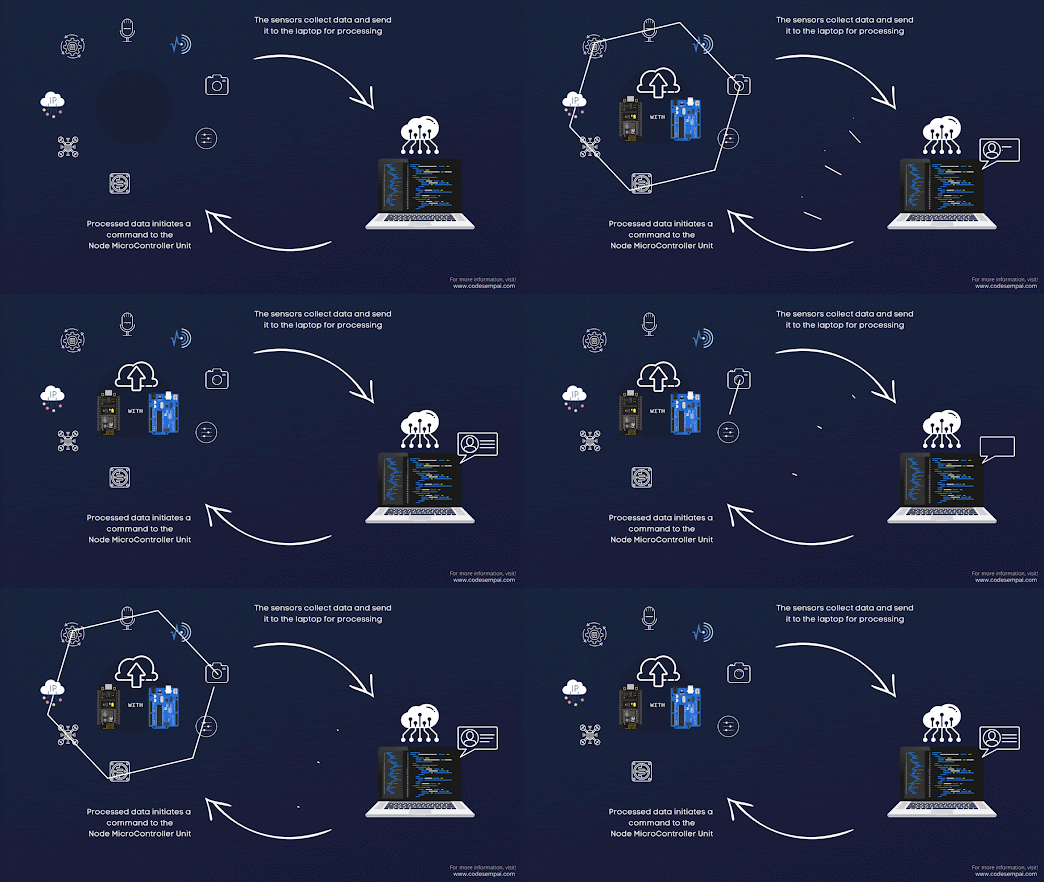
A prototype was built using Arduino and Node MCU with Serial communication and channeled processing on a laptop through IoT through the webserver. This prototype can be easily converted to Raspberry Pi.
I just want to showcase an efficient way to deploy an AI in a Microcontroller, so that anyone affordably deploys Machine learning and deep learning model in a Microcontroller.
I know there are many different processors where AI can be deployed, but they are not budget-friendly & For beginner-friendly
OpenCV Features
- Self-driving/Learning.
- Object Detection.
- Body tracking.
- Face detection.
Open cv with Robotic Arm
[face detection Mode and Object detection ]
With the combination of face detection Mode and Object detection, If a user needs something you just need to call AMIGO BOT and say what u need! And Amigo searches it for you and starts object detection mode after locating an object, it picks up and gets switched with face detection then it locates and gives it to the user. AMIGO takes Commands with speech recognition and is further operated autonomously. It does this with the help of open cv and custom object detection.
Self-driving and Learning Explained
[ Behavior Cloning ]
I used Behavior Cloning the human will drive the robot around & Ai will not only learn how to drive the robot but also abstractify features, and try to understand why the human is driving the robot the way they were. This ability to abstractify is actually what makes this Ai so Powerful. And will allow The Ai to drive a situation never seen before. Based on this information I chose the behavior cloning model for this Ai. To train the Ai used Webserver with IoT controlled. Which allowed me remotely steer the robot as it learned
Theft Detection Mode Explained
[ Body tracking and Face detection ]
Think about a thief breaking into your house. A thief will make certain sounds and motions which the robot will detect and locate while Triggering Theft Detection mode By the combination of Body tracking and Face detection When The assistant is in the Theft detection mode After An sound is detected with the sensor The Assistant initiates Body Tracking Algorithm: If the Body is detected a primary alert is sent to the user After Monitoring body tracking, it switches with Face detection. If an unknown face registered is found the final Alert is Activated. And send an alert message to the user
So this is how theft detection works. This can be a major solution for household security.
MAKING OF THE ROBOT
This is the making of the AMIGO BOT, which took more than 4-months Of Research, Training, and deployment. The AI Data was created by training the costume model.
Experimenting and perfecting the model required lots of time.
PROTOTYPE APPROACHES
There are 3 -Approaches we can Make
- Raspberry pi: An Single bord for processing where the deployment of machine learning and deep learning algorithms can be done easily.
- Arduino & node MCU: Serial communication is done with nodemcu and Arduino and channel processing with IoT & WEBSERVER on the laptop.
- And third, creating Creating web-app by using APIs for processing DATA.
PROTOTYPE I APPROCHED
I made a prototype with Arduino & node MCU with Serial communication and channel, processing with a laptop through IoT and a web server. This prototype can easily be shifted to Resbery pi Due to the High pricing of raspberry pie, I have Implemented this in Arduino and Nodemcu The second version of the bot will be definitely implemented in Raspberry pi.
SOFTWARE
These are the Screen-Shots of the AMIGO SOFTWARE
Amigo comes with software with speech recognition and voice command which Helps A User with easy Automation For PC as it's integrated with a Webserver a user can control And customize the Amigo bot With its need this Software comes with many unique features
Which helps the user save time and energy. As a Developer, I have created developing tools which are very helpful for the developers for easiness of work
Custom Modules: I have created many new modules for the AMIGO, One of the best is Custom Voice for the Amigo comes with a natural and friendly voice that helps with human interaction and shows realism.
There are more than 70 + Features built for development and automation.
Some of these are listed here.
- Advanced Editing
- System Management
- Web Automation
- And many More
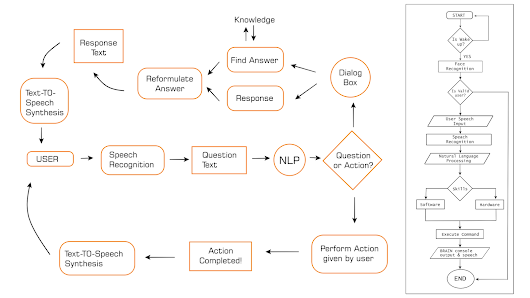
Basic Architecture | Algorithm | Block Diagram
IMPROVEMENT
[ Improvements needed for the Amigo bot ]
To improve, more training data is needed as in the prototype stage, the training data is limited. More data and experiment results could make the learning process more interactive.
FUTURE UPGRADES
- This was my MARK 2 of the ROBOT, As the MARK 1 is uploaded on my Youtube channel [Codesempai]
- MARK 3 and 4 will be deployed in Single board processing units like Resbery pi/Jetson Nano And more Advancement in the Process will be Done.
ACHIEVEMENTS
This AMIGO BOT got selected in the 2nd RUNNER-UP in National Hackathon


